Boss Guides
Here you can find guides on how to kill certain bosses.
- Boss guides
- Ancient Barbarians Guide
- Alchemical Hydra Guide
- Corrupt Banker Guide
- Archangel & Archdemon guide
- The Nightmare
Boss guides
Introduction
Welcome to my bossing guide. In this guide I will take you through how to kill a lot of bosses on RuneRealm and what items and gear setup to bring. There are a lot of bosses on RuneRealm, some easy, some hard to kill, but most of them don't require much tactics so they don't need a guide of their own. I will include most bosses in guide, if you feel like there is something missing, make sure to let staff know in-game or through discord! Note that you can get many bosses as a slayer task from Nieve, or kill certain bosses for another slayer task, such as KBD for a Black Dragon task, or Skotizo for a Black Demon task. It is strongly advised to always wear a Black Mask, Slayer Helm and/or Slayer Chestplate/Chainskirt [(i) if using ranged or magic] when killing bosses on task.
Disclaimer: Droprates may vary based on your personal drop rate reduction and may be subject to change if the developer feels obligated to do so.
Ancient Barbarians
The Ancient Barbarians are three different bosses in one room (similar to Dagannoth Kings), which can be killed after completing the quest 'Ancient Barbarians'. Click here if you want to read the quest guide and click here for a boss killing guide written by Supreme.
Alchemical Hydra
The Alchemical Hydra is a very strong boss that can be killed after the completing the quest 'Creepers in the Crevice'. Click here if you want to read the quest guide and click here for a boss killing guide written by Calebb.
Cerberus
Cerberus is a lvl 318 boss that requires lvl 91 Slayer to kill. You don't need to be on a task to kill Cerberus. Cerberus attacks you with magic balls which do little damage if using protect from magic prayer. It does not spawn adds contrary to OSRS, making this a fairly easy boss to kill. You can kill Cerberus with any style, melee or ranged would work best. Cerberus is notable for dropping crystals which can be added to certain boots to create 3 of the strongest boots in the game. Cerberus can not be killed with a team, you can only kill it solo.
Recommended stats:
80+ attack, strength, defence
80+ hitpoints
80+ ranged (if using ranged)
70+ prayer
Recommended items
- Super combat potions or ranged potions depending on what style you are bringing, their respective hearts or Overloads.
- Prayer potions
- Food
Gear options:
Melee

Ranged

Setups are ideal in their lvl range. Higher tier gear makes kills faster. You can use lower gear to kill this boss, but it could be more of a challenge. You can also bring a blowpipe instead of a crossbow.
Drop table

Drop rates may vary based on your personal drop rate reduction
Corporeal beast
Corporeal beast is a lvl 785 boss that has a whopping 2000 hitpoints. Corporeal beast does very high damage with melee and magic. You should always use protect from Magic, as he attacks more with magic and will do more damage. Using protect from magic won't fully protect you, but reduces it's damage by a lot. The fastest way to kill Corporeal beast is with a team but it is also soloable. A very common strategy is do bring Corp's defence down with a Dragon Warhammer or Statius's Warhammer. You can teleport home (or to the sponsor zone) to quickly restore your stats and spec and teleport back in to bring it's defence further down. You can use this method going both solo and in a team. When in a team, you can also bring ranged. Note that Corporeal beast only takes full damage from Spears. All other attacks will do half of the damage to Corp.
Recommended stats:
90+ attack, strength, defence
90+ hitpoints
90+ magic (for magic defence)
90+ ranged (if using ranged)
80+ prayer
Recommended items
- Super combat potions or ranged potions / Overload / Ferocious heart and Twisted heart or Ominous heart
- Prayer potions
- Food
-Double damage potion & Cannon
Gear options
Melee

Other weapons than a Zamorakian spear should only be used if you have bis in other slots. DPS is comparable. Samurai can be used if going with a team.
Ranged

With bis gear, corp can be killed solo with ranged, but it is advised to only use ranged if going with a team.
Drop table

Drop rates may vary based on your personal drop rate reduction
Corrupt sorceress
The corrupt sorceress is a lvl 126 boss that has 500 hitpoints. You can only get access to the boss if you are a Donator or have a higher donator rank. You can find the corrupt sorceress boss through the boss portal in the Donator zone. Corrupt sorceress has not a very high lvl given the fact it's a boss, but that doesn't make it any easier to kill. This boss can be quite the challenge, especially in the beginning and if you have low lvl gear. The corrupt sorceress attacks you with magic, and sometimes freeze you. She also teleports you around if you get to close to her and occasionally spawns some adds which will damage you until you kill them. This boss has high magic so therefore it is not advised to use magic against her. Due to the teleporting around melee isn't advised either. Ranged is the way to go, Twisted bow being the best due to said magic lvl. Keep as much distance as possible from the boss to prevent getting teleported around. An easy way to get rid of the adds quickly is to bring a Toxic blowpipe so you can shoot them quickly. Experienced players might be better off not killing the adds at all. This boss has quite a good drop table, including some great uniques such as the Master wand the Sorceress pet, which has a unique special effect, learn more about it in the pets guide.
Recommended stats:
90+ ranged
90+ hitpoints
90+ magic (for magic defence, optional)
80+ prayer
Recommended items:
- Ranged potion / Twisted heart / Ominous heart / Overloads
- Prayer potions
- Food
- Blowpipe if using a Twisted bow (optional, to kill the adds)
Gear options
Ranged

Drop table

Corrupt banker
The corrupt banker is a custom boss accessible for extreme donators or higher. It can be found behind the portal in the Super donator zone. Click here to read the full guide written by Archvillain.
Dagannoth kings
Dagannoth kings are lvl 303 bosses, they are 3 giant Dagannoth who are together in the same room. There's Dagannoth Rex, Prime and Supreme. They all use a certain combat style and are weak to another combat style in line with the combat triangle:
Dagannoth rex - attacks with melee - is weak to magic
Dagannoth prime - attacks with magic - is weak to ranged
Dagannoth supreme - attacks with ranged - is weak to melee
They all have some unique drops but also share some unique items, such as the Archer's, Seers and Berserker ring, but also the Dragon hatchet and the Seercull bow. When you teleport to the Dagannoth kings, you come in the room above them. When you climb down the ladder you will enter their room and be immediately in range of Dagannoth supreme, which can also poison you. You can kill this and stay in place to keep killing supreme, but you can also move the north/northeast corner to kill Supreme, or go to the south/southeast to kill Rex. It is advised to stay in the corners as much as possible to not attract the other kings, unless you want to kill them all at the same time. You can kill these bosses solo or with a team. They are considered to be quite easy bosses, especially when killing them one by one, so a team is not really necessary.
Recommended stats:
80+ attack, strength, defence
80+ hitpoints
80+ ranged (if using ranged)
70+ prayer
Recommended items
- Potions or hearts depending on which boss you are taking on or Overloads
- Prayer potions
- Food
Gear options

Minimal set to use on the boss that is weak to your respective attack style. Blood money sets will also do fine between these bosses, but you might take a bit too much damage if you don't have a very strong weapon. Having strong melee gear and a weapon will be good enough to kill all bosses.
Drop table

Drop rates may vary based on your personal drop rate reduction
Demonic gorillas
Demonic gorillas are lvl 278 npc's who have 380 HP. They are strong monsters who use protection prayers. You need to bring at least 2 combat styles to defeat these monsters. Whenever fighting these gorillas, they will change their overhead prayer every few seconds to your combat style, forcing you to change combat style if you want to defeat them. They will also change the combat style they are attacking you with, so you have to keep paying attention and switch prayers if you don't want to die.
- Melee attack: Demonic gorilla slashes his claws up and down on your character
- Ranged attack: Demonic gorilla throws a small boulder to the player
- Magic attack: Demonic gorilla lifts his front body and head up and throws a green ball towards the player
They have low defensive stats but a little bit of magic defence, so it is advised to bring melee and ranged only. They count as Black demons should you have those as a slayer task. Demonic gorillas are notable for their Uncut zenyte drops, which are used to make Zenyte jewellery and Ballista parts, which are used to make the Light ballista and Heavy ballista.
Recommended stats:
90+ attack, strength, defence
90+ hitpoints
90+ magic (for magic defence)
90+ ranged
77+ prayer
Recommended items
- Super combat potions, ranged potion / Ferocious heart and Twisted heart / Ominous heart / Overloads
- Prayer potions
- Food
Gear options
Melee

Ranged
Blowpipe is also a very strong option against Demonic gorillas.
Drop table

Drop rates may vary based on your personal drop rate reduction
Ethereal revenant
The ethereal revenant is a fully custom lvl 620 undead boss that has a whopping 900 HP. It is a fully custom boss specially designed for RuneRealm. It is one of the strongest bosses in the game. This boss attacks with both melee and mage and can do high damage to you. Protection prayers will help, but not a lot. The Ethereal revenant is notable for it's Ethereal armor drops, which is a custom tank set. When wearing a full set, it will reduce damage done by the Ethereal revenant by 40%. It also reduces damage taken in the wilderness from npc's by 40% and from other players by 10%. You can kill this boss with both melee and range, it is advised to bring the best gear and weapons you have. Using a double damage potion will make it a lot easier to kill this boss.
Recommended stats:
95+ attack, strength, defence
95+ hitpoints
90+ magic (for magic defence)
95+ ranged (if using ranged)
90+ prayer
Recommended items:
- Salve amulet (Ethereal Revenant is an undead npc)
- Charged bracelet of Ethereum (reduces the special attack of the ethereal revenant)
- Super combat potions, ranged potion / Ferocious heart and Twisted heart / Ominous heart / Overloads
- Prayer potions
- Food
Gear options
Melee

Ranged
A twisted bow with BIS ranged gear is recommended as the revenant has a very high magic level of ~350.

Drop table

Ferocious basilisk
The Ferocious basilisk is a lvl 870 boss with 475 HP. You need to have at least 60 slayer to damage this monster. It is a very strong boss that can deal very high, accurate damage to you. This boss attacks you with melee and magic and has a very strong, accurate special attack. He can also venom you. This boss drops V's shield, which will reduce his special attack damage by a lot. It will also protect you against Venom. This shield is very good if you want to grind Ferocious basilisk. You can kill the boss without the shield, giving you to the opportunity to bring very strong 2h weapons such as Scythe or Twisted bow, but for incoming damage, a 1h weapon with V's shield works the best. You can also use a Mirror shield which is sold at the Slayer points shop. It does not protect you against venom but will reduce the Basilisk's special attack damage by 25%. This boss is notable for it unique drops such as V's shield, but also the Basilisk Jaw which can be used to make Neitiznot faceguard, one of the strongest melee helms in the game and Ferocious heart, which is the melee variant of Imbued heart. Overall, Ferocious basilisk has a good drop table, so you can make some nice GP on the side when you're grinding it's uniques. Generally speaking you can kill this boss with any style. With lower gear and accuracy, magic might be the best, especially if using blood barrage for healing, if you have (close to) bis gear, melee will probably do better. Ranged falls somewhere in-between.
Recommended stats:
95+ attack, strength, defence (defence 90+ if not using melee)
95+ hitpoints
90+ magic (for both magic defence and if using magic attacks)
95+ ranged (if using ranged)
80+ prayer
Recommended items
- Super combat potions, ranged potion / Ferocious heart and Twisted heart / Ominous heart / Overloads
- Food
- Prayer potions
- V's shield or Mirror shield
- Anti-venom potions if you don't have V's shield
Gear options
Melee

Ranged

Magic

Drop table

Giant mole
Giant mole is a lvl 230 boss with 200 HP. It is considered one of the easier bosses to kill as it only uses one style (melee) and has no special attacks or mechanics to deal with. He can hit pretty accurate but all damage will be neglected if you keep protect from melee up. It doesn't offer very good normal drops, only a few high lvl runes. It most notable drops are elite clue scrolls, a stack of yew logs and it's pet. The best way to kill the Giant mole is with a ranged setup with a Twisted bow, but using melee works fine too.
Recommended stats:
75 attack, strength, defence
75 hitpoints
85 ranged (if using ranged)
60+ prayer
Recommended items:
- (Super) combat potions or ranged potions/Ferocious heart, Twisted heart or Ominous heart
- Food
- Prayer potions
- Slayer helm (only reccommended if on slayer task, slayer helm (I) if using ranged)
- Bonecrusher and Dragonbone necklace/Bonecrusher necklace/Sponsor aura (optional, having one of these will automatically bury dropped bones for you and restore a small portion of prayer, saving you prayer potions and making it easier to AFK kill this boss
Gear options
Melee

Ranged

Drop table

Godwars bosses
The Godwars dungeon is a large dungeon filled with medium to high lvl monsters and four bosses. There are 4 bosses all in their own room in each corner of the dungeon. These bosses are generals from one of the gods and are assisted by 3 minions. To get access to these boss rooms, you need to kill a certain amount of npc's that follow the respective god you want to enter the room from. All of the npc's follow a certain god. All the monsters in the Godwars dungeon are aggressive and will attack you on sight, unless you are wearing an item of the god their following. You can wear multiple items from different gods to gain protection from all monsters. Inside the boss room you are not protected by what you're wearing; the general and it's minions will always attack you. Note that every boss room has an altar where you can fully restore your prayer once per 10 minutes.
The 4 bosses and the god they follow:
- General Graardor (Bandos) in the Northwest area
- Kree-Arra (Armadyl) in the Southwest area
- Commander Zilyana (Saradomin) In the southeast area
- K'ril Tsutsaroth (Zamorak) In the northeast area
To access the boss rooms, you will need at least 20 kill count (KC) of the respective boss. If you leave the dungeon your KC will be reset. The following npc's can be killed for their respective god KC:
Bandos: Goblin, Hobgoblin, Ork, Ogre, Jogre*
Armadyl: Aviansie*
Saradomin: Blessed imp, Knight of Saradomin, Saradomin priest, *
Zamorak: Pyrefiend, Ice fiend, Bloodveld, Gorak, Hellhound, Werewolf, Feral vampyre, Imp*
* All bosses have an area between their room and the main area where you can find Spiritual warriors, rangers and magers, which will give KC to the respective god area you're in. There are also a few in the main Area, you can recognize which god they follow by how they look: The goblin/ogre likes are for Bandos, the flying one's are for Armadyl, if they are human-like and wear blue gear they are for Saradomin, if they are human-like and wear red gear they are for Zamorak.
You need 10 KC to enter the boss room. Donators have the requirement halved, having to kill only 5 minions, and super sponsors have the KC requirement removed completely. To enter the areas before a specific boss you need to bring either an item, have a certain skill lvl or both:
Bandos area: A hammer and 70 strength
Armadyl area: A crossbow, a mithril grapple (can be bought from the general store at home) and 70 ranged
Saradomin area: 70 agility
Zamorak area: 70 hitpoints
All bosses drop their own hilt and Godsword shards which can be combined to make a godsword. The godsword shards work on any hilt, but you need 3 different shards to make a Godsword blade. Each sword does the same damage but they have their own unique special attack.
Bandos godsword: Can deal up to 21% extra damage and reduces the target stats for the amount hit. Does one combat stat each in the following order: Defence, strength, prayer, attack, magic, ranged. Uses 50% special attack.
Armadyl godsword: Deal up to 50% extra damage and is up to 50% more accurate. Uses 50% special attack.
Saradomin godsword: Deals up to 10% extra damage with double your accuracy, and restores respectively 50% and 25% to your health and prayer of the damage you've dealt. Uses 50% special attack.
Zamorak godsword: Deals up to 10% extra damage with double your accuracy and freezes the target for 20 seconds if you've damaged your target. Uses 50% special attack.
General Graardor
General Graardor is a lvl 624 boss that has 250 HP. In his room are also 3 minions, where 2 of them are lvl 142 and the other one is lvl 141. They can be found in the northwest of the dungeon, you need to go through the door on the northwest, which requires a hammer to go through, then walk north to find their room. Graardor and his minions hit very accurate and can deal very high damage. Graardor hits you with melee, and sometimes smashes on the floor, doing ranged damage. All of his minions will attack you with a different style. If you wanna do multiple kills in a run, it is advised to kill the mager first (Steelwill) then the ranger (Grimspike) and lastly Strongstack, who deals melee damage to you. It is highly recommended to always have protect from melee up when Graardor is alive. You can flick protect from ranged when he smashes the floor. If you don't, he can hit high 30s with his ranged attack. Graardor's normal drops are average for his lvl and difficult, but he has a very good unique drop table. He drops Bandos armor, which is a strong melee set, he also drops a custom Bandos imbue scroll, which allows you to imbue Bandos armor, making the gear pieces permanently stronger, as well as a unique pet. Note that Graardor's minions have a very low chance to drop Bandos equipment too. The best way to kill Graardor is with melee. You can also kill him with ranged, but i wouldn't recommend this, unless you have very high stats and good gear.
Recommended stats:
90+ attack, strength, defence
90+ hitpoints
95+ ranged (if using ranged)
80+ prayer
Recommended items
- Hammer (Can't enter the room before Graardor's room if you don't have one, goblins have a chance to drop one if you forgot)
- Super combat potions or ranged potion / Ferocious heart or Twisted heart / Ominous heart / Overloads
- Food
- Prayer potions
- A strong special attack weapon such as Dragon claws or Armadyl godsword
Gear options
Melee

Ranged

Drop table

Kree'Arra
Kree'Arra is a lvl 580 that has 250 HP. It has 3 minions at lvl 143, 149 and 159. They can be found in the southwest corner of the Dungeon. You need a crossbow and mithril grapple to traverse the hole, then walk west to find their room. Kree and it's minions will deal fairly accurate damage, Kree will hit you with ranged attacks and do a special attack sometimes, which will always hit you, and his minions will attack you each with a different combat style. It should be noted that Kree and his minions are Aviansies which can not be damaged with melee. You should always bring ranged to kill them. There is a strategy to kill Kree'Arra where you run along the walls of the room, keeping distance to Kree so you take a lot less damage, this of course makes the battle a lot more intense, but allows you to do more kills in one run. Kree's drop table isn't that special, the unique drops on the other hand are worth it to kill this boss. Kree'Arra drops Armadyl armor pieces, which is very strong ranged gear and also drops Armadyl imbue scrolls which allows you to make the gear pieces even stronger.
Recommended stats:
90+ attack, strength, defence (attack and strength only if you use Scythe of Vitur)
90+ hitpoints
95+ ranged
80+ prayer
Recommended items
- Crossbow and mithril grapple
- Super combat potions or ranged potion / Ferocious heart or Twisted heart / Ominous heart / Overloads
- Food
- Prayer potions
Gear options
Ranged*
*If you are doing the kiting method (running around the room avoiding close range) you should bring the best crossbow, bolts and ranged shield you can. As a minimum you should bring dragon crossbow and an odium ward, the best you can bring is an Armadyl crossbow and a twisted buckler.
Drop table

Commander Zilyana
Commander Zilyana is a lvl 596 boss that has 255 HP. There are 3 minions assisting Zily that are lvls 139, 146 and 149. They can be found in the southeast of the dungeon, you need to go down the waterfall, then go down another waterfall on the south to get in the last room before the boss room. Zilyana and it's minions can hit you quite hard. Zily will hit you quite fast with melee and often lifts off the ground, doing a special magic attack. You can reduce damage from this hitting by flicking protect from magic. Many players use the kiting method to kill Zily, running around the room against the wall and attack her from a long distance to reduce incoming damage. This is obviously quite intense but should allow you to do more kills in one trip. The Twisted bow works excellent against Zily due to it's high magic lvl, but lower ranged items work fine too. If you have a very strong weapon and gear you can also kill her with melee. Zily's normal drop table isn't that great, although it frequently drops Saradomin brews, which is one of the few ways to get them. Zilyana drops various unique weapons such as the Saradomin sword and Armadyl crossbow, as well as it's own unique pet.
Recommended stats:
90+ attack, strength, defence (attack and strength only if you use melee)
90+ hitpoints
90+ ranged
80+ prayer
Recommended items
- Super combat potions or ranged potion / Ferocious heart or Twisted heart / Ominous heart / Overloads
- Food
- Prayer potions
- A strong special attack weapon if you're bringing melee such as Dragon claws or Armadyl godsword
Gear options
Ranged

Melee
Drop table

K'ril Tsutsaroth
K'ril Tsutsaroth is a lvl 650 boss that has 255 hp. He has 3 minions of lvl 142, 145 and 151. They can be found in the northeast corner of the dungeon. You need to swim across the broken bridge on the northeast which requires 70 HP to do so, then walk to the east to find the boss room. Kril and his minions will hit you very accurately. Sometimes Kril halves your prayer points whenever he hits you and he can also damage you. He will hit you with all 3 styles. The minions will all hit you with a different style each. Kril is considered one of the, if not the hardest boss in the GWD due to the amount of damage you can receive. The best way to kill this boss is with melee, it does not have a very high defence.
Recommended stats:
90+ attack, strength, defence
90+ hitpoints
80+ prayer
Recommended items
- Super combat potions / Overloads / Ferocious heart or Ominous heart
- Food
- Prayer potions
- Anti-poison
- A strong special attack weapon such as Dragon claws or Armadyl godsword
Gear options
Melee

Drop table

Kalphite queen
The Kalphite queen (KQ) is a lvl 333 boss that has 510 HP. KQ is a fight split up in 2 phases, in each phase she has 255 HP. She will attack you with all combat forms and can poison you in both phases. She has two protection prayers up during the first phase: ranged and magic. During this phase, you can only damage her with melee. She can hit very accurate with all styles, magic being the strongest, so it is advised to keep protect from magic up at all times. When she dies she transforms into her flying form, starting the 2nd phase. During this phase she has protect from melee up. She has very high magic defence so it is strongly advised to bring a ranged weapon and gear for this phase. KQ drops a wide variety of items, the most notable being in the Dragon chainbody and her own pet.
Recommended stats:
90+ attack, strength, defence
90+ hitpoints
90+ ranged
90+ magic (optional, for higher magic defence)
70+ prayer
Recommended items
- Super combat potions and ranging potions / Overloads / Ferocious heart and Twisted heart or Ominous heart
- Food
- Prayer potions
- Anti-poison
- A strong special attack weapon such as Dragon claws or Armadyl godsword
- Ranged gear and weapon
Gear options
Melee
Ranged

Drop table

King black dragon
The King black dragon (KBD) is a lvl 276 boss that has 240 HP. To get access to the KBD lair you need to go through the wilderness, where other players can attack you! The fastest way to access it's lair is by using the boss teleport in the spellbook to KBD. You will be teleported to high lvl wilderness, a little bit outside of the entrance. Run east into the Lesser demon pit and go down the ladder, you will go straight into KBD's lair. KBD will attack you with melee, magic and dragonfire and he can poison you. If you fight KBD from a distance, he will only use magic and dragonfire. Make sure to keep protect from magic up at all times if doing this. If you fight in melee range, he will mostly do melee and dragonfire damage to you, and occasionally hit you with magic. At a low lvl, the easiest way to kill this boss is with ranged from a distance, using a crossbow with an anti-dragonfire shield. If you have strong gear, you can also kill KBD with melee. The best items to use are a Dragon hunter crossbow or a Dragon hunter lance, which will do 40% extra damage against the KBD. You should always wear any anti-dragonfire shield when fighting KBD, and drink anti-dragonfire potions if using a regular anti-dragon shield. KBD can drop some good items for a little money making, and has some nice uniques such as the Draconic visage which is used to make a Dragonfire shield, but also it's own pet.
Recommended stats:
90+ attack, strength, defence
90+ hitpoints
90+ ranged (if using ranged)
90+ magic (optional, for higher magic defence)
70+ prayer
Recommended items
- Super combat potions or ranging potions / Overloads / Ferocious heart or Twisted heart/Ominous heart
- Food
- Prayer potions
- Anti-poison
- Any form of anti-dragonfire such as a potion
Gear options
Ranged

Melee

Drop table

Kraken
Kraken is a lvl 291 boss that has 255 HP. You need 87 slayer to be able to damage it. Kraken lives in the water and can only be attacked with ranged or magic. It has high magic defence so it is advised to bring a ranged setup. It will only attack you with magic and is considered a relatively easy boss to kill. This boss does not have the best drop table for a boss but does drop some nice unique items such as the Kraken tentacle, Uncharged trident and it's own pet!
Recommended stats:
75+ ranged
70+ defence
60+ prayer
Recommended items
- Ranging potions / Overloads / Twisted heart or Ominous heart
- Food
- Prayer potions
Gear options
Ranged

Drop table

Lizardman shaman
Lizardman shaman are lvl 150 monsters that have 150 HP. They are quite strong monsters and have a high accuracy. They will attack you with melee and ranged if you're close to them, and only with ranged if you attack them from a distance. They're ranged attack is a green slimy attack which will poison you. They also have a special attack where they jump in the air and land on the place where you stood when they jumped. If you do not move away, they will deal very high damage to you. If you move one or 2 tiles you'll still receive damage, but less than if you didn't move. If you move more than 3 tiles away you'll receive no damage. Protection prayers will not prevent you from getting damaged by their jump attacks. You can kill them with either melee or ranged. Use protect from melee if using melee, and protect from ranged if you are using ranged. You should always bring a form of antipoison. Wearing a Serpentine, Magma or Tanzanite helm will drastically reduce their ranged damage and prevent you from getting poisoned. Lizardman shaman have a pretty good drop table and have a low chance to drop the Dragon warhammer, one of the best special attack weapons in the game.
Recommended stats:
85+ attacked, strength, defence
85+ hitpoints
85+ ranged (if using ranged)
70+ prayer
Recommended items
- Super combat potions or ranging potions / Overloads / Twisted heart or Ferocious heart/Ominous heart
- Food
- Prayer potions
- A form of antipoison
Gear options
Melee

Ranged

Drop table

RFD bosses
The RFD bosses are 5 different bosses which can be killed after completing the custom Recipe for disaster quest. When you've completed the quest, you can kill the 5 bosses in a particular order to receive their pets. Check the quest guide to see an overview of the quest and boss fights and the special pet effects their pets give. The bosses have to be killed in this order. When you've collected a pet of the first boss, you can go to the next one and so on until you have the last one. You do not need to drop the pet or have the pet follow you to be eligible for the next one. Note that you can not use prayers in this boss area. Note that all bosses only drop some candy, and rarely metal gloves and a pet.
Agrith Na-Na
Flambeed
Karamel
Dessourt
Culinaromancer
Recommended stats:
85+ attacked, strength, defence
85+ hitpoints
85+ ranged
Recommended items
- Super combat potions or ranging potions / Overloads / Twisted heart or Ferocious heart/Ominous heart
- Food
Gear options
Melee

Ranged

Drop table*

Skotizo
Skotizo is a lvl 321 that has 450 hp. This demon can be found in the Catacombs of Kourend. You need a Dark totem to kill the boss. Totem pieces drop of various npc's which can be combined to a Dark totem. One dark totem is good for one attempt at Skotizo. You must use the totem on the altar at the centre of the Catacombs which is located at the teleport spot. If you log out or leave the area, you will need another totem to try and kill Skotizo again. As mentioned earlier this boss is a demon, so you can use a Black mask or Slayer helm if you have a greater or black demon slayer task. You can kill this boss with both melee and ranged. If you use melee, one of the best weapons to use is Arclight, which is 40% stronger against demons. If you kill this boss with melee, you can bring gear with high magic defense and protect from melee. More experienced players can just bring melee gear and keep protect from magic up. It may feel slightly easier for less experienced players to bring ranged and keep protect from magic up at all times. Skotizo will sometime spawn a reanimated demon to fight alongside him. If you're taking a lot of damage you're best off to kill these and if not, you can just leave them be. They will despawn after the fight. Skotizo will always drop a clue scroll and frequently totem pieces or a full totem, but is also notable for his unique drops such as the Silverlight sword, as well as its own pet.
Recommended stats:
80+ attacked, strength, defence
80+ hitpoints
70+ prayer
85+ ranged (if using ranged)
80+ magic (optional, for extra magic defense)
Recommended items
- Dark totem
- Super combat potions or ranging potions / Overloads / Twisted heart or Ferocious heart/Ominous heart
- Food
- Prayer potions
Gear options
Melee

Ranged
Drop table

Thermonuclear smoke devil
The Thermonuclear Smoke Devil is a level 301 slayer boss. It has 240 hitpoints and requires level 93 slayer to kill it. Despite its high level and requirements the Thermonuclear Smoke Devil is a fairly easy boss to kill even at a low level, provided you have Protect from Melee. Even without protection prayers it's maximum hit is around 12 but it will hit very accurately, so it is advised to always use protection prayers. It attacks with ranged. This boss is most notable for it's unique drops such as the Dragon chainbody, Occult necklace and it's own pet.
Recommended stats:
80+ attacked, strength, defence
85+ hitpoints
85+ ranged (if using ranged)
93 slayer (hard requirement)
70+ prayer
Recommended items
- Super combat potions or ranging potions / Overloads / Twisted heart or Ferocious heart/Ominous heart
- Food
- Prayer potions
Gear options
Melee
Ranged
Drop table

Vorkath
Vorkath is a lvl 732 boss, this dragon has 750 HP and despite his name meaning 'weakling' it is the strongest dragon in the game. Vorkath can attack you with all styles, including dragonfire, poison and a few special attacks. As long as you stay out of melee range, Vorkath will not attack you with melee. A form of anti-dragonfire is an absolute must to defeat this boss. This boss can be challenging for medium geared players, for more experienced players this boss shouldn't be too hard, although a tiny mistake can be deathly. Vorkath has 3 attacks, a ranged attack, where he shoots a green projectile from his mouth towards the player and poisoning them, a magical freezing attack, where Vorkath shoots a light-blue projectile to the player, and a dragonfire attack, where the player is hit by a fireball, Vorkath also launches a fire attack in the air, hitting the player if they don't move away a few tiles, resulting in a lot of damage. This can easily be avoided if you move away for at least 3 tiles. The best way to kill Vorkath is with ranged, preferably a Dragon hunter crossbow combined with a Dragonfire shield or ward. Protect from ranged can be up at all times to reduce the ranged damage, and you can flick protect from magic when he launches it's freeze attack. If you don't think you're fast enough to switch, you can have protect from magic up at all times. Vorkath has some very cool unique drops such as it's own head, which is used to make an Ava's assembler, a Draconic visage and it's own pet.
Recommended stats:
85+ ranged
85+ hitpoints
80+ defence
74+ prayer (for rigour)
80+ magic (optional, for extra magic defense bonus)
Recommended items
- Ranging potions or overloads / Twisted heart or Ominous heart
- A form of antipoison
- A form of anti dragonfire
- Prayer potions
Gear options

Drop table

Zulrah
Zulrah is a lvl 725 boss that has 500 HP. It has a decent amount of HP and has moderate defence as well, but it is still considered a relatively easy boss to kill. Zulrah is a giant snake that resides in a swamp. You can only attack Zulrah from a small island with ranged or magic. Every 20 seconds, Zulrah dives into the water and resurfaces a few seconds later with a different colour, attack style, weakness and sometimes another location. Zulrah has three colours: Green, where it attacks with ranged, red where it attacks with a typeless attack and cyan, where he attacks with magic and ranged. When in cyan form, Zulrah's attacks more with magic, which also deals more damage and is more accurate, so it is advised to use protect from magic on this phase. During Zulrah's red phase, you can avoid his melee attacks if you hide behind one of the pillars.
When Zulrah is green, it is weak to magic, when cyan it is weak to ranged and during the red phase its defense is higher, but magic would be more effective than ranged. The pattern Zulrah's phases follow are always the same: Green centre, red centre, cyan centre, green back, red centre, cyan westside, green back, cyan back, green westside, red centre, after this the cycle will restart. Every time Zulrah resurfaces it will also spawn a snakeling, a lvl 90 npc that will deal up to 15 damage and can venom you, it only has 1 hp. For low lvl players it is advised to bring both magic and ranged, for the more experienced, med lvl player, bringing ranged only will suffice. The same goes for killing the snakelings, lower lvl should finish them off immediately, more experienced players could just leave them be. Zulrah has a wide variety of drops such as the Serpentine helm, which is a very good ranged helm that protects you from venom, and gives you a chance to envenom your target. Zulrah also drops the Magma and tanzanite mutagen, which can be used to recolour the Serpentine helm to respectively a melee and magic variant. Zulrah also drops the Tanzanite fang which can be crafted into a Toxic blowpipe, as well as it's own pet and many more items.
Zulrah does not respawn after being killed, you have to leave and re-enter the area to make it respawn.
Recommended stats:
80+ ranged
80+ hitpoints
80+ defence
77+ prayer (for rigour and augury)
80+ magic (if using magic)
Recommended items
- Ranging potions/magic potions or overloads / Twisted heart/Imbued heart or Ominous heart
- A form of antivenom
- Prayer potions
Gear options
Magic (optional, if using)

Ranged

Drop table

Wilderness bosses
All the bosses below have to be killed inside the wilderness. The wilderness is a dangerous area where you can lose your items if you die. Other players can attack you here, so be cautious of what you bring to the wilderness. Note that all wilderness bosses commonly drop Mysterious emblems, which can be redeemed at the emblem trader for bounty points. Also, shown gear setups are recommended, focused at the best way to kill these bosses. Bringing all of these items may be risky if you die, so take in consideration how much you could afford to lose. All wilderness bosses also have a direct teleport close to their area. The best weapons to use in the wilderness are the Viggora's chainmace, Craw's bow and Thammaron's sceptre. They deal are 50% more accurate and deal 50% more damage in the wilderness. They drop from revenants and need to be charged with Revenant ether. With every hit you use 1 charge.
Callisto
Callisto is a lvl 470 bear that has 255 hp. You can find him in lvl 45 wilderness south of the lava below the Demonic ruins. It is a very strong monster with high defence. He attacks you with melee and sometimes knocks you back, stunning you for a few seconds and dealing heavy damage. The best way to kill Callisto is with melee. He is immune to magic damage. You could use ranged if you have Craw's bow if not, you're best off using melee. He is most vulnerable to slash, and least to crush. Callisto is notable for dropping the Tyrannical ring, Dragon pickaxe, as well as it's own pet.
Recommended stats:
80+ attack, strength, defence
80+ hitpoints
70+ prayer
Recommended items
- Super combat potions, ferocious heart or Ominous heart
- Super restore potions
- Saradomin brews
- A one click teleport
- Gear to defend yourself against magic
Gear options

Drop table

Chaos elemental
The chaos elemental is a lvl 305 boss that has 250 hp. You can find him around lvl 52 wilderness, flying around the Rogue's castle in the north-east of the wilderness. The chaos elemental can damage you with all forms. It can also uses a special attack where it unequips your gear. Your gear will be placed in your inventory. If you do not have free space in your inventory it will not use this attack. It can also teleport you around in the area, sometimes where you can't even see it. It will eventually fly to you if you can't find it, unless you ran the wrong way out of his range. It is advised to keep protect from magic up, as it seems to be using magic most frequently and often deals most damage as well. The best way to kill this boss is with ranged. The Chaos elemental does not have many notable drops, the best it drops are the Dragon pickaxe and it's own pet.
Recommended stats:
70+ ranged
75+ hitpoints
70+ defence
74+ prayer (for rigour)
70+ magic (optional, for extra magic defense)
Recommended items
- Ranging potions, Twisted heart or Ominous heart
- Super restore potions
- Saradomin brews
- A one click teleport
Gear options

Drop table

Chaos fanatic
The chaos fanatic is a lvl 202 boss that has 225 hp. It can be found in lvl 40 wilderness, southwest of the KBD entrance. It attacks you with magic and is relatively weak. Every few seconds he shouts some random words. Whenever he shouts 'All your wilderness are belong to them' (yes this is exactly what he's saying) he attacks you with an aoe attack that can hit you multiple times, but can be avoided if you move a few tiles away. You can kill the Chaos fanatic with both melee and ranged. Chaos fanatic is notable for Malediction and Odium shards, as well as the Chaos elemental pet.
Recommended stats:
70 attack, strength or 70+ ranged and 70+ defence
75+ hitpoints
70+ defence
60+ prayer
70+ magic (optional, for extra magic defense)
Recommended items
- Super combat potions/Ranging potions, Ferocious/Twisted heart or Ominous heart
- Super restore potions
- Saradomin brews
- A one click teleport
Gear options
Melee
Ranged
Drop table

Crazy archaeologist
The crazy archaeologist is a lvl 204 boss that has 225 hp. He can be found in lvl 22 wilderness at the ruins west of the bandit camp. This boss shares a lot of similarities with the Chaos fanatic. It shouts random things at you, is relatively easy to kill. He attacks you with ranged and magic. Whenever he shouts 'Rain of knowledge' he attacks you with an aoe attack that can do multiple stacks of damage, this can easily be avoided if you move away a few tiles. You can kill the Crazy archaeologist with melee and ranged. It is notable for dropping Odium and Malediction shards.
Recommended stats:
70 attack, strength or 70+ ranged and 70+ defence
75+ hitpoints
70+ defence
60+ prayer
70+ magic (optional, for extra magic defense)
Recommended items
- Super combat potions/Ranging potions, Ferocious/Twisted heart or Ominous heart
- Super restore potions
- Saradomin brews
- A one click teleport
Gear options
Melee
Ranged
Drop table

Scorpia
Scorpia is a lvl 225 giant scorpion boss that has 200 hp. Scorpia can be found in a cave which is located in a scorpion pit at lvl 53 wilderness, between the Mage arena and Rogue's fortress. Scorpia is a challenging boss to kill that has some mechanics. Scorpia attacks you with melee and can poison you which can hit you for 20 damage, so bringing a form of antipoison is highly recommended. Whenever Scorpia goes below 99 hp, it will spawn 2 guardians which will not attack you but do heal Scorpia. They will not stop healing her even if she's at full hp, but they will despawn after 15 seconds. If you kill them they will not respawn in that fight, even if they healed Scorpia over 99 hitpoints. There are also offspring's in the area which can hit you very accurately with ranged and drain your prayer. The most effective way to kill Scorpia is with magic. She has very low magic defence. You can use freeze spells to bind her in place, while having protect from ranged up against the offspring's. You can also freeze the guardians if they're not in range of Scorpia so they can not heal her. A different way to kill her is to kite her around. Run around the room to prevent her getting in melee range, while attacking her with magic. Players with very high lvl gear and stats should be able to kill her with melee, but you should stay focused on your own hitpoints. Scorpia is notable for dropping the Malediction and Odium shards, as well as her own pet.
Recommended stats:
70+ magic
80+ hitpoints
80+ defence
80+ prayer
90+ attack and strength (if not using magic)
Recommended items
- Magic potions/Super combat potions Imbued heart/Ferocious heart or Ominous heart
- A form of antipoison
- Super restore potions
- Saradomin brews
- A one click teleport
Gear options
Magic

Melee

Drop table

Venenatis
Venenatis is a lvl 464 mega spider that has 255 hp. This boss can be found in lvl 28 wilderness on the east side, in a big spider pit. Skotizo is a poisonous spider that will attack you with magic. The easiest way to kill these boss is to keep a distance and attack it with ranged. It is advised to bring a form of antipoison to kill this boss. Sometimes this boss drains your prayer. Many players place a cannon inside the spider pit for extra dps. This boss notable for its unique drops such as Dragon pickaxe, Treasonous ring, as well as its own pet.
Recommended stats:
75+ ranged
75+ hitpoints
74+ prayer
Recommended items
- Ranging potions or twisted heart
- A form of antipoison
- Super restore potions
- Saradomin brews
- A one click teleport
Gear options
Drop table

Vet'ion
Vet'ion is a lvl 454 boss that has 510 hp. He can be found in lvl 35 wilderness, between the green dragons and the chaos dwarves, southeast of the lava dragon isle. Vet'ion has two phases, in each phase he has 255 hp. Vet'ion is considered a challenging boss to kill, due to his high accurate hits and fight mechanics. Vet'ion attacks you with long range melee attacks, this mean he can attack you with melee even if you're not standing in melee range. He also occasionally does an avoidable magic attack, where he launches 3 lightning strikes towards the player, you can avoid this by running a few tiles away. In both forms, when Vet'ion reaches half hp, he will spawn two Skeleton hellhounds. When these are alive, you can not damage Vet'ion. You must kill the hellhounds before you can proceed killing Vet'ion. After you've brought Vet'ion down, he will resurrect in an orange form. These two fights do not require a different approach. Vet'ion is considered undead, which means it is highly advised to bring a Salve amulet. He has very high defensive stats, his biggest weakness is to crush, so it is advised to bring a crush weapon. Vet'ion has few good drops such as the Dragon pickaxe, Ring of the gods as well as its own pet.
Recommended stats:
85+ Attack, strength and defence
80+ hitpoints
70+ prayer
Recommended items
- Super combat potion or Ferocious heart/Imbued heart
- Super restore potions
- Saradomin brews
- A one click teleport
Gear options

Drop table

Walking chaos
Walking chaos is a lvl 1337 boss that has 3000 hp. It can be found at the chaos altar in lvl 13 wilderness. It is one of the strongest bosses in game, and is considered a multi boss that should be killed with a group. Having prayer up reduces damage a bit, but he will still hit you very frequently and hard however, you must always have Protect from magic up, due to the many lvl 129 chaos druids around attacking you. There is a way to kill this boss solo which i will explain below, if you do not have the items and stats, i highly advise not to try and kill this boss solo. The best way to kill this boss is by lowering his stats with a Dragon Warhammer, I'd say at least 4, but preferably 9 successful specs to make him a lot more squishy. A Viggora's chainmace is also highly recommended due to it doing the best melee damage in the wilderness. 2 other items that are very good are a Divine spirit shield and Amulet of blood fury. Divine spirit shield absorbs a bit of damage and drains your prayer instead, while Amulet of blood fury has a chance to heal you for a portion of damage you've dealt. Blood fury is not necessary to kill the boss, but it is very handy. Walking chaos has a very unique drop which is the Walking chaos pet, which has a passive effect to make you deal 15% extra magic damage anywhere, and give you a 5% drop rate boost inside the wilderness when enabled.
Recommended stats:
99 attack, strength and defence
99 hitpoints
99 prayer
99 magic (optional for extra magic defense)
Recommended items
- Super combat potion or Ferocious heart/Imbued heart
- Super restore potions
- Saradomin brews
- A one click teleport
Gear setup

Drop table

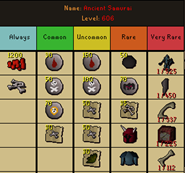
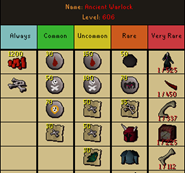
Ancient Barbarians Guide
Introduction
Ancient Barbarians are level 606, Hp 355. You will need to complete Ancient Barbarians quest to access boss teleport. There is a guide in Quest Guides.
Boss is not hard to kill as long as you don’t draw all their aggro on you.
Mechanics are similar to Dagannoth kings.
Ancient Samurai – Attacks with Melee and is weak to Magic.
Ancient Warlock – Attacks with Magic and is weak to Ranged.
Ancient Archer – Attacks with Ranged and is weak to Melee.
Setups/Gear
If you are wondering how to fight these 1 by 1, all you need is a Visionary Orb. You can unlock it by spending 50 ability points on Patchy. (In order to unlock Visionary, you will have to unlock all 4 abilities in the column, which will cost you 73 ability points)


For gear, Ninja, Kyudo, Samurai set works for me. As they will not hit very hard if you pray accordingly and eat.


Strategy for Ancient Samurai
Teleport to Ancient Barbarians using Boss Lairs Teleport, remember to turn off Auto Retaliate when you memorize location with your orb.
Step 1- Run there and save the exact location shown in picture with visionary orb.
Step 2- Teleport using your orb, use Blood Blitz on samurai and pray melee. (Afk-able since blood blitz heals you) *Bring dragonbone necklace, and bonecrusher/ Sponsor Aura so you can afk longer.

Make sure don’t move around, just stand at the tile your orb brings you or else you will draw aggro from other boss.
Strategy for Ancient Warlock
Step 1- Run there and save the exact location with visionary orb.
Step 2-Teleport using your orb, use best range gear on Warlock and pray mage. Remember to use Long range attack so you don’t have to move and hit it(Not afk-able in my opinion, Warlock hits hard sometimes)
Strategy for Ancient Archer
Step 1- Run there and save the exact location with visionary orb.
Step 2-Teleport out to lose aggro from other bosses. Teleport back in and kill the Archer with Ranged or magic.
*Ancient Barbarians are not instance bosses, therefore if someone else is fighting other boss, it may interrupt the aggro.
Rewards/Drops
Once you collect all fatal shards, you can combine them to make Fatal Blade.
Have fun farming!
Credits: Supreme, Two
Alchemical Hydra Guide
INTRODUCTION

Requirements
95+ Slayer
Rewards
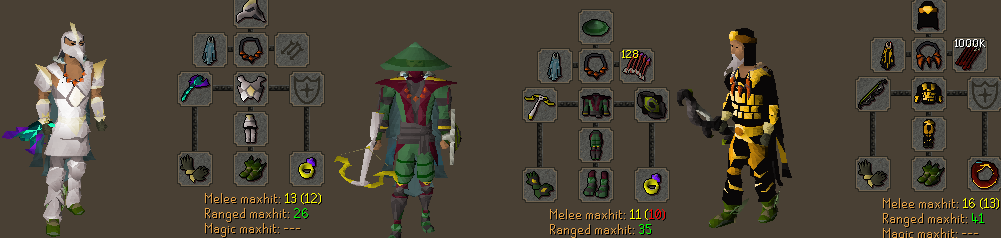
Recommended Gear for Melee
SHIELD: Avernic Defender > Dragon Defender > Dragonfire Shield
HELMET: T5 Statius > T4 Statius > Neitiznot Faceguard > Magma Helm > Neitiznot Helm
CHEST/LEGS: T5 Vesta > T4 Vesta > T5 Statius > T4 Statius > T3 Vesta > Bandos (i) > Bandos
AMMO: Rada's Blessing 4 > Any other God Blessing
GLOVES: Ferocious Gloves > Barrows Gloves
BOOTS: Primordial Boots > Dragon Boots
RING: Commander Ring > Berserker Ring (i) > Brimstone Ring > Berserker Ring
SPECIAL ATTACK: Bandos Godsword > Dragon Warhammer > Statius's Warhammer > Dragon Claws > Dragon Dagger(p++) > Vesta's Longsword

This would be my personal best-in-slot setup for killing Alchemical Hydra as fast as possible. I prefer BGS as a spec weapon because Hydra only has 100 defence, so one good hit will increase your hit chance significantly. Dclaws are used for the second spec if BGS does sufficient damage on the first. I prefer Blood Fury over Torture because you'll spend less time eating, making kills faster.
Recommended Gear for Ranged
SHIELD: Twisted Buckler > Dragonfire Ward > Odium Ward
HELMET: T5 Morrigan > T4 Morrigan > T3 Morrigan > Armadyl (i) >Serpentine Helm > Armadyl
CHEST/LEGS: T5 Morrigan > T4 Morrigan > T3 Morrigan > Armadyl (i) > Armadyl
AMMO: Dragon Arrows (for tbow) > Ruby (e) adamant bolts (above 500 hp) and Dragonstone (e) rune bolts (under 500 hp) (for DHCB) > Any God Blessing (for Blowpipe)
GLOVES: Barrows Gloves
BOOTS: Pegasian Boots > Ranger Boots > God dragonhide boots
RING: Commander Ring > Archers Ring (i) > Brimstone Ring > Archers Ring
SPECIAL ATTACK: Bandos Godsword > Dragon Warhammer > Statius's Warhammer > Dark Bow > Toxic Blowpipe
This would be my personal best-in-slot setup for killing Alchemical Hydra as fast as possible with ranged. I prefer BGS as a spec weapon because Hydra only has 100 defence, so one good hit will increase your hit chance significantly. Dark Bow is used for the second spec if BGS does sufficient damage on the first.
Walkthrough for Fight
Videos
Corrupt Banker Guide
Introduction
The Corrupt Banker is a Level 126, 666 HP Boss that uses Melee attacks if you get close, and a 3x3 magic attack if you are at a distance/on occasion within melee range.
You can access the Corrupt Banker when you are an Extreme Donator, which requires at least $100 donated. You can find this boss behind the yellow portal in Super-Donator zone (::sdz)
NOTE: This boss can be considered mid/late game as he has decently high HP, high defenses, and thus is not efficient to kill until you have good gear (reference below)
Drops:
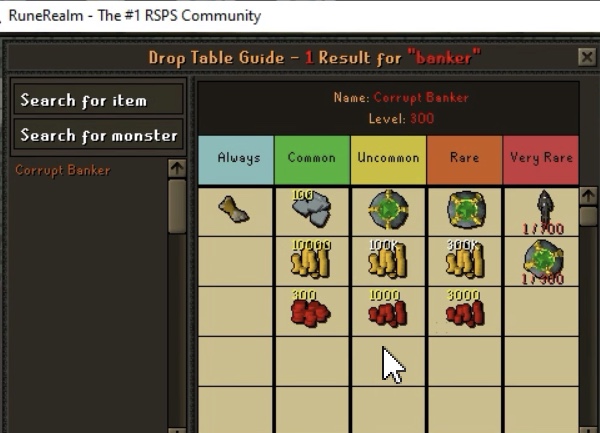
As you can see the Corrupt Banker’s main drop is the Banker pet, which allows you to bank and note/un-note anywhere. (The Table is base Drop Rate with. 0% boost)
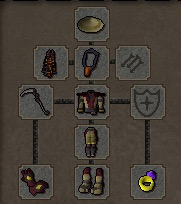
Gear
You can fight the Corrupt Banker with Melee or Range. The following Setups are ranked from least to most effective. The weapon is the most important as such if you dont have any of the following weapons: Blowpipe, Twisted Bow, or Scythe of Vitur then you should get one of the three then fight the Corrupt Banker. I only list the minimum and recommended. The Twisted Bow falls in the middle and obviously you can work with different gear for melee if you do not have samurai (barrows, magma helm etc.).
Minimum:
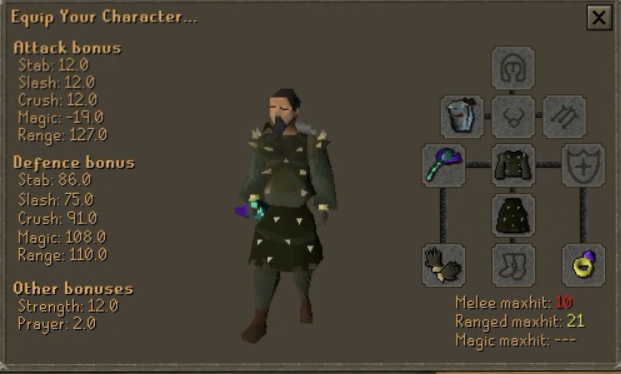
The boots, helm, and necklace do not matter as much so they are not listed. Most importantly have a.Blowpipe, Assembler, and karils or better with barrows gloves and a row (i). This is what I consider to be the minimum setup for the corrupt banker.
Recommended:
This Setup is the best possible for The Banker. The Scythe and the Samurai Outfit Make for quick work of the Corrupt Banker.
Strategy
Fighting the Corrupt Banker is fairly straight forward. He only has 2 attacks: a melee attack if you are within ~4 squares of him, and an unblockable magic attack where he shoots 3 lightning bolts in a 3x3 area where you are standing at the time.
Note: It is HIGHLY recommended to use a double damage pot even in the best set up. he has very high hp and defenses and without it kills can take 3-6 minutes each.
If using Melee: Pray melee and attack Dodge his lightning bolts (reference below)
If using Range: Pray rigour/best + range pray you have and dodge his lightning bolts (reference below)
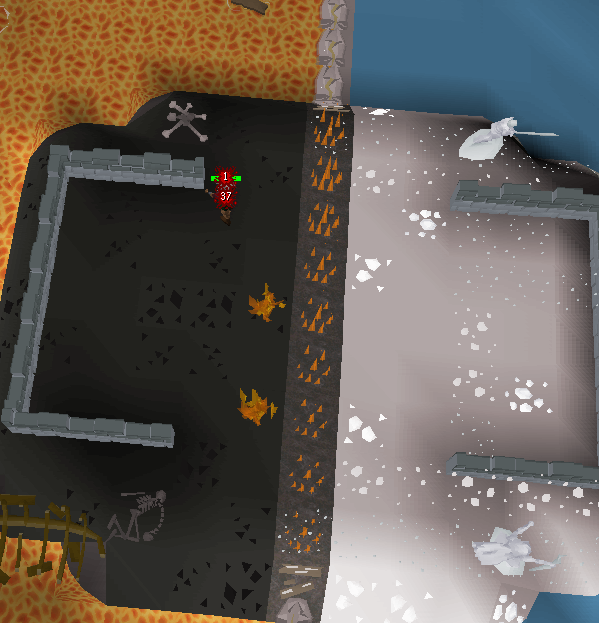
Lightning attack
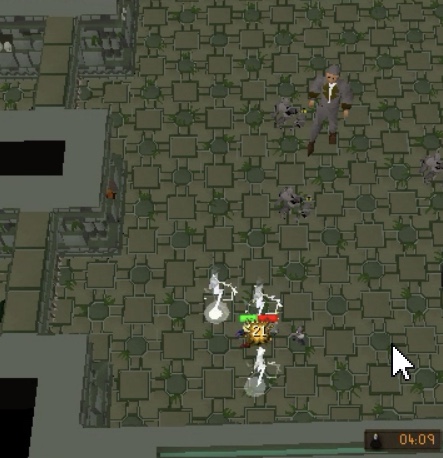
As you can see I got hit by the corrupt banker’s lightning attack. he shoots 3 bolts in a 3x3 square wherever you are standing at the time. It is unblockable and unless you move on his windup you will get hit. He uses this very quick, about every 3 seconds, but is easy to dodge if you have the know how.
Dodging the attack (GENERAL INFO)
Looking at the image the Corrupt Banker’s Windup in blue is easy to spot if you pay attention. As he does so take note of where you are standing (in red) and use the round and square tiles to figure out the 3x3 area his lightning bolts will target.
Then run one square outside the 3x3 square attack radius AS SOON as you see his windup. Then resume attacking. It is quite the process to do this over and over but as you fight him more it will get easier and easier.
simply repeat this dodging the whole fight until he is dead and hope you get lucky on the pet drop :)
NOTE: After killing him, he will respawn around 10 seconds later and IMMEDIATELY attack with a lightning attack so be prepared to dodge or take the damage.
Dodging the Attack (RANGE VIDEO EXAMPLE)
Dodging the Attack (MELEE VIDEO EXAMPLE)
There you go! You are set and ready for a long (or hopefully short) grind at the corrupt banker boss to get that rare and important Mr Banker
Good luck!
Archangel & Archdemon guide
The Archangel & Archdemon are Two custom made RuneRealm bosses. They are respectively combat lvl 777 and 666 and have a whopping 1000 hitpoints. They require at least two players to kill. There might be ways to kill the bosses solo such as using Insta-kill darts but those will not be covered in this guide.
These 2 bosses rely in a small area, each part of the area belongs to one boss. They both float above the lava or water. You can only attack them with ranged or magic, ranged being the best way. The bosses are able to hit you from anywhere around the platform, there are no safe spots. During the fight the areas can be split up as well, disabling players to move to the other side. They attack random players with magic damage. Keep protect from magic up to mitigate most incoming damage. The bosses have a few different mechanics as well. Every few attacks they do one of their special attacks. Note that if one of the bosses die, the other boss will take over the mechanics of the other boss. They can heal each other sometimes which will be explained further down below. Note that the bosses don't have to die at the same time. If one of them dies, it won't respawn until the other one has been killed to.
Special attacks
Healing
Bosses have to stay within a certain threshold of HP of each other. If the difference between their hitpoints becomes to big, they start healing each other. It is important to keep the same amount of players, or dps on each side. They will also receive healing if one of the bosses has not been attacked for 15 seconds. They will then receive healing once every 5 seconds, until both bosses have been hit once again.
Fire walk
Archdemon puts a fire under you, damaging you very fast for 8-12 damage the whole time you stand in the fire. The fire will follow you around for about 10 seconds and leave a trail of fire. If other players stand in this they will receive the same damage too. The fire stays up for quite some time. When the boss is dead, the fire won't damage you anymore if you stand in it.
Spheres
Archdemon will shoot a sphere towards up to 3 random each with their own style of attack. There will also be a message in chat if a sphere is sent towards you. Red (aggressive) = melee, Green (Accuracy and dexterity) = ranged, purple (magical power) = magic damage. Your overhead prayer will be disabled at the start of this attack so you can't rely on these beforehand. If you fail to turn on the right prayer on time the sphere deals around 60 damage.

Split region
A fire wall will appear in the centre splitting the two regions, disabling players to move to the other side. If you stand on the line you will receive damage. You cant walk on/through it but if you were standing on this spot you will be pushed to a random side and receive damage, or when you teleport into the area you will receive damage too, similar to the fire walk attack until you move away.
The player who has done the most damage to a boss will receive a drop, this means up to 2 players can receive a drop during a fight with both bosses. The drops will appear after both bosses have been killed. They have a shared collection log and killing either counts for the amount killed in the collection log.
Level advice:
90+ defence
90+ ranged
A high magic lvl, the higher your lvl the bigger the chance you will receive lower damage from their magical attacks.
Gear advice:
As a minimum, full Kyudo or Morrigan's T3/Armadyl (I) will work fine, but you might have a hard time dealing with the mechanics of the boss, as the fight takes longer with this gear. The Twisted bow is the best weapon to use, but a blowpipe will work fine too. If using Kyudo without a Twisted bow, an Armadyl crossbow works best.
Fight overview
The best way to kill these bosses is with 2 strong, well geared players, or 2-4 mediocre geared players. Make sure to have about equal amount of players on each boss to prevent the bosses healing each other. Having more players makes it easier as it increases dps, but only 2 players will receive drops. It is also more challenging to cope with the fire walk attack if there is more players cause there is a bigger chance other players will receive damage when they kill the boss. Key here is to keep players standing in each other during the fire walk attack, but it is not required.
When the areas are split, just keep attacking the other boss and wait till you can move again. During the fight it is not necessary to move a lot.
When the spheres are thrown towards players, the easiest way to track this is to keep an eye on chat, but you only have a few game ticks to react. Keep your mouse close to your protection prayers to be able to react as fast as possible. Try to keep your HP over 75 to reduce the chance of being stacked out if you pray to late.
Once the bosses have done all of their special attacks they will start over doing these. They will do a special attack after they've each done 5 normal magic attacks. If one dies, the other one will also do the mechanics of the other boss. When they've both died, the players who've dealt most damage to each boss receive loot.
Rewards
The bosses have a very unique shared drop table, dropping items such as Divine whip and Lucified whip, which are two very strong, custom whips with equal stats to each other. Combining both of these with the Serpentine whip creates the Ominous whip, the strongest one-handed weapon in the game. They also drop the Holy ancestral kit, which allows you to recolour your imbued ancestral pieces, as well as the Holy and Sanguine ornament kit, which allows you to tweak your Scythe of Vitur, Ghrazi rapier or Sanguinesti staff. They also drop a unique pet, which can be morphed into the other.

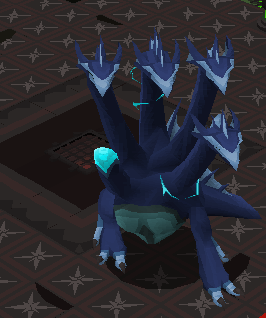
The Nightmare
This guide is mainly focused on the recently released Nightmare boss. The Phosani, which is a solo only variant, works slightly different and is not yet released (as of writing this guide).
Overall the Phosani will be very similair in mechanics but slightly less forgiving for mistakes, however there will be less rotations and the time to kill it should be significantly faster than the regular Nightmare (at least while soloing, perhaps even in small teams).
Mechanics:
-
Disturbing the nightmare inside the lobby area will teleport you in to the room, disturbing the nightmare inside the room will start a 30 seconds join timer until the fight starts and players can no longer join
-
The nightmare in the lobby area will visually update/animate depending on the stage of the fight (asleep if no fight is going on, wake up and float with her head down while the join timer is active, and fully possessed floating (with a symbol underneath her indicating in which phase/how far along the fight currently is) during the fight
There are 3 "rotations"
- At the start of the fight she has her blue shield up, which players need to drain in order to progress
- After her shield has dropped the totems open up and players can attack these to "charge" them up, once all 4 totems are fully charged they unleash a magical blast that deals 800 damage to the nightmare (players are unable to attack the nightmare directly and can only damage her through this)
- After the blast (unless she has died) she will release sleep walkers near the totems (1 for each player in the room, capped at 8) that walk towards her, each sleep walker that reaches her will charge up the damage for her blast attack that damages all the players (min 5, max 70 damage) (if all sleep walkers get through the players are guaranteed to get killed)
This repeats until she has died (total of 2400 HP but she does not heal, meaning 3 rotations in total where the sleep walkers only occur twice)
During each of these rotations she uses 3 standard attacks and several special attacks (she uses 2 unique specials for each phase, and always uses the grasping claws special)
She targets the player that has the highest defence roll but most of her attacks can damage multiple people in the room
Standard attacks
Protection prayers should block 80% of the max damage, but praying incorrectly increases the max hit by 20%
- Melee only hits towards the player that is being targeted, however other players that are nearby the target will still get hit by this attack, so stand on opposite sides. This is also the only standard attack that ignores accuracy checks and always hits.
- Magic and ranged hits all the players in the room
Special attacks
- Grasping claws (all phases) will spawn portals under the players (unless they are immobilized by husks) and more random ones around the room (it is possible for portals to spawn under immobilized players if there are multiple players on that tile of which one is not immobilized) they will deal heavy damage if still on them when the nightmare strikes (or if underneath nightmare, on the portal, itself)
- Flower power (phase 1) will spawn nightmare berries and blossoms, splitting the room into 4 sections, players should move to the quadrant that is indicated with the flowers as otherwise they will start taking rapid damage when they bloom and any damage they would deal to the nightmare is now healing her instead (Nightmare will not initiate this special attack while there are still husks alive)
- Husks (phase 1) will spawn 2 husks next to a certain amount of players, one dealing magic damage (blue) and one dealing ranged damage, the player will be unable to move until both of his husks are killed (other players are able to help out in killing these husks)
- Parasites (phase 2) will impregnate a certain amount of players in the team with a "parasite" that will grow within you for a bit, after it has fully grown it will pop out of your belly while dealing a (in)significant amount of damage to you. Afterwards it will start to either: heal the nightmare (if it is in the shield phase of the fight), discharge the totems (if during the totem phase and there are totems that have been partially charged), attack random players
In order to negate most of the damage dealt by the parasite coming out, players should drink a dose of sanfew serum (or relicyms balm, currently onobtainable) which will weaken the parasite as well (a lower level parasite will now appear when it's born) - Curse (phase 2) special attack will curse each player on the team (the top hp bar overlay will turn pink as an additional indicator) which will shuffle your overhead prayers (always in the same direction, which is 1 to the right (so click the one on the left of the one you want to turn on))
- Surge (phase 3) the Nightmare will jump to a random side of the room, afterwards surging across to the other side (massively damaging anyone in her way)
- Spores (phase 3) will spawn mushroom like objects around the arena, standing within 1 tile of one will cause it to explode, this will disable the players run and for a short duration makes the player tired which also lowers their attack speed by 1 tick
Rewards
When the fight is over, there will be several calculations to provide the loot pool
- In order to be eligible for a unique item a player must have damaged at least the nightmare and the totems (combined) for a 100 damage each, as well as reach a minimum threshold of total damage, if a player is eligible for a unique they will receive a regular bones drop in combination with their other drop
- The player that dealt the most overall damage gets big bones dropped instead
- There will be 2 seperate rolls for an unique item:
1. The first roll (1 in 120) with a table containing the nightmare staff and inquisitors pieces
2. The second roll (1 in 600) with a table containing the orbs
Both rolls will occur for each kill (so it is possible to get both items), which will then be rewarded to one of the players (of those that are eligible for a unique) randomly picked but weighted by total damage dealt (damage towards nightmare and the totems) - The unique item drop rates are not affected by drop rate boost % as these are rolled per lobby (they are affected in Phosani's instance as this is a solo encounter), however items like the clue scroll, little nightmare and jar are rolled individually for each player that was eligible for a unique and thus affected by your boost
- There will also be 3 boss points awarded for all players that were eligible for a drop and 5 boss points for the person who did most damage
- You will need to have dealt at least 300 total damage in order to be eligible for a regular drop (and receive a kill count)
- Regular drops have a minimum and maximum quantity, of which the quantity is scaled based on your contribution (your damage dealt vs the overall damage dealt, compared to the team size) so if you have dealt (atleast) 25% damage while in a group of 4 you will receive the maximum amount for that item
- Drops are placed 1 tile infront of you (between you and the nightmare) instead of 1 big pile under her for all players, however effects like sorceress pet or bonecrusher should still be in affect
Post fight
After the fight she returns to her resting state on the same location that she died on, after a few seconds the "disturb" option becomes available again and players can restart the fight this way.
She will remain on that tile when she spawns, however if all players have left the area she will fully respawn in the center tile again